Tuesday, September 27, 2011

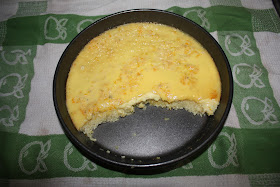
SPINACH & RICOTTA QUICHE


In keeping with the spinach & cheese theme of yesterday, I tried my hand at making a Weight Watchers Spinach & Ricotta quiche. Have you ever realised, during the preparation and/or cooking process, that what you are making does not even slightly resemble the picture in the cookbook? Well, this happened to me. I was shattered. My first attempt at making a quiche and I failed. But then I had a thought; what is the big deal if my quiche doesn't look exactly like the picture in the book? It seems to be the little imperfections that really make our lives what they are; completely random and exhilarating. So I embraced my lopsided quiche for what it was; imperfect but beautiful in its flaws...and extremely delicious.

(Note- I also changed the recipe slightly which may have been the reason for the difference in the finished product! Personally, I think cooking is much less fun when you are bound to follow every single little step with exact precision. It makes me feel like I am back in school).


Ingredients

  • 1 sheet frozen reduced-fat puff pastry, partially thawed 
    • in my experience you may need 2 sheets if you do not have a 22cm 'fluted flan tin', which I do not think many people have lying around. 
  • 2 teaspoons olive oil
  • 1 brown onion, finely chopped
  • 1 garlic clove, crushed 
  • 160g frozen chopped spinach, thawed
    • If you witnessed my rant with yesterday's dish, do not use frozen spinach!! The taste is so incredibly bland compared to if you use fresh english spinach and wilt it for a few minutes with a dash of olive oil and crushed garlic in a saucepan. I used 1 medium sized bunch of english spinach for this recipe. 
  • 3/4 cup (150g) reduced-fat fresh ricotta cheese
  • 1/2 cup (40g) grated parmesan cheese
    • or any other grated cheese that you have on hand. 
  • 4 eggs
  • 1/4 cup (60ml) low-fat milk 

Cooking 

1. Wilt spinach by placing it in a medium saucepan with a dash of olive oil and 1-2 teaspoons of crushed garlic. This will take around 3-5 minutes. Remove from heat and let spinach cool. When cooled, squeeze excess moisture from spinach and chop. 

2. Preheat oven to 200 degrees Celsius or 180 degree fan forced. Lightly spray a 22cm (base measurement) fluted flan tin with oil. Line tin with pastry. Like I said above, I am not in possession of this very particular type of tin so I used a 30 cm pie dish, which is less shallow. As a result, you may need to use 2 sheets of pastry. If you are not so fussed about your quiche looking perfect, don't trim the excess pastry. 

3. Place tin on baking tray. Cover pastry with baking paper and fill with ceramic pie weights. Now I am also not in possession of pie weights. Uncooked rice or dried beans also work well. Bake for 10-15 minutes. Remove weights/rice/beans and paper and cook for another 3-5 minutes or until base is golden. 

4. In the meantime, heat oil in a large non-stick frying pan over medium-high heat. Add onion and cook, stirring for 3-5 minutes or until softened. Add garlic and cook, stirring, for 30 seconds. Depending on how much garlic you used to wilt the spinach, you may not want to add additional garlic. In my opinion, you can never have too much garlic. (Fun fact: garlic is a natural antibiotic and it appears that the body has built up less of a resistance to this vegetable/herb than many modern pharmaceutical antibiotics. Just goes to show that the best stuff for our bodies really does come from the ground). 

5. Place spinach, onion mixture, ricotta and parmesan (or other cheese) in a bowl. Whisk eggs and milk in a jug until combined. Season with salt and freshly ground black pepper. Sprinkle spinach mixture over pastry in tin. Pour egg mixture over spinach. Bake for 25-30 minutes or until pastry is golden and the egg has set. Stand quiche for 5 minutes before removing from the tin. 

Serve with a salad if you like. I made one of my favourite salads with chick peas, tomato, cucumber, red onion, avocado and balsamic vinegar as a dressing, 

Preparation time: 15 minutes 
Cooking time: 45 minutes


x E 

Monday, September 26, 2011

OLIVIA NEWTON-JOHN IMPRESSES


I must admit that I am very sceptical whenever an actress/model/singer/heiress releases a cookbook. I usually refuse to read the books, for two reasons; 1. I do not believe that they eat/drink anything but air and evian water, and 2. If they really do know what they are talking about, I feel an overwhelming surge of jealously at how multi-talented they are. 

Saying that, I became intrigued when I came across Olivia Newton-John's 'LivWise' due to the words 'Easy', 'Happy' & 'Healthy' on the front cover.  Also, the woman is 62 years of age! She must be doing something right to be in that good a shape. 

Within a few days of borrowing the book I had written several of the recipes in my journal for me to try out. This beauty below is a favourite of mine and can be eaten for breakfast, lunch, dinner or as a snack. 


SPINACH & FETTA FRITTATAS 


DO NOT be turned off by the 'spinach' in the title here. Spinach is definitely not the best tasting vegetable in my opinion. Before making this recipe, I associated spinach with the bland-tasting, totally processed spinach that you buy frozen at the supermarket. Using English Spinach and wilting it with garlic really changes the taste, as Olivia has discovered. 

Ingredients 
  • olive oil spray or 1 tablespoon olive oil
  • 150g english spinach leaves, washed 
  • 1 garlic clove, crushed
  • 2 eggs 
  • 2 egg whites
  • 60ml skim milk
  • 1 tablespoon finely grated parmesan cheese
  • 70g low fat feta cheese, cut into 1cm cubes. 
Cooking 

1. Lightly coat a 6 hole muffin tin with oil. 

2. Preheat oven to 200 degree Celsius. Put spinach and garlic in a saucepan over medium heat. Cover and steam for 3 minutes or until spinach has wilted (I prefer stirring the spinach until it has wilted to really mix in the garlic evenly). Allow spinach to cool slightly, then squeeze out any excess liquid and roughly chop leaves. 

3. In a bowl, whisk together eggs, egg whites, skim milk and parmesan. Stir in spinach and season with ground pepper. 

4. Spoon mixture into muffin holes, filling each 3/4 full. Lightly press 3 feta cubes onto the top of each frittata. 

5. Bake for around 15 minutes or until frittatas are golden and egg is set. Serve immediately, as they will deflate quickly. Serve with freshly ground pepper if desired and with a salad for lunch, alongside meat for dinner or with an english muffin and roasted tomato for breakfast. 

Note - I've started to browse other celebrity's cookbooks since I had my Olivia breakthrough. I would highly recommend it. This experience has taught be a valuable lesson in the importance of being nonjudgemental. Who knew cooking was so deep?


x E 

VANILLA BEANS - A REVELATION


In my little bubble centering around me, myself and I, I have never stopped to ponder where vanilla comes from. Like many other fortunate people in this world, food has appeared on my plate for 23 years and I have never stopped to think about the long journey that item took to wind up on my plate. Oh the ignorance!

This leads to a story about vanilla beans. Until a month or so ago, I had never stopped to think about where vanilla actually came from....

Vanilla beans are the fruit of an orchid, the only orchid (out of thousands in the world) that produces an edible fruit. A small flower similar in shape to a trumpet grows on a vine, and is only open for part of one day. Not all flowers/fruit open at once, but vanilla growers check each plant on a daily basis to monitor its flowering. Once the flower is open, it is hand-pollinated to produce the fruit or potent vanilla beans as we call them. Although vanilla is native to Mexico, Madagascar is currently the world's largest producer.

The reason that vanilla beans are not cheap (they are the second most expensive spice after saffron) is because growing the vanilla seed pods is very labour intensive. Vanilla beans grow very quickly on vines but are not ready for harvest until they have matured, so around 10 months. Harvesting the vanilla beans is no easy feat. As mentioned above, each bean ripens at its own time, resulting in a daily harvest. Every single vanilla bean is picked by hand to ensure the finest flavour, just as the pod begins to split. Did you know that a vanilla beans commercial value is determined by the length of the pod?

So, equipped with this new-found knowledge, I decided to make a dessert using a real vanilla bean. I was at Burleigh Heads a month ago in a health food shop when I noticed that my good friend had discovered vanilla beans for only $1.90 each (1 bean is around $6 in a supermarket and they are not as nice). So you can understand my excitement. I purchased a few and then set about finding a recipe that was worthy of this amazing little bean.


CITRUS RICE PUDDING 


Also to add, this is my first ever rice pudding! AND would you believe, it is low fat. Another guilt free dessert to indulge in.

Ingredients 

  • 2 cups (500ml) no fat milk 
  • 1 vanilla bean, halved lengthways 
  • 1 teaspoon finely grated lemon rind
  • 1 teaspoon finely grated lime rind
  • 2 teaspoons finely grated orange rind 
  • 2 eggs
  • 1 egg white
  • 1/2 cup (100g) caster sugar
  • 1 1/2 cups (225g) cooked doongara rice
Cooking 

1. Preheat oven to moderately slow- this means about 150- 160 degrees Celsius. Grease swallow oval overproof dish. As you can see in the picture mine was more circular. 

2. Cook 1 1/2 cups of doongara rice in 3 cups of water. Bring to the boil and then simmer rice for 10-15 minutes. 
-Embarrassing note- In my excitement to make this recipe the first time, I skimmed over the ingredients and I did not cook the rice prior to placing it in the oven. In my defence, there was no cooking step in the book reminding me to cook the rice...it just goes to show how much my boyfriend and my sister must love me as they ate it anyways! And it wasn't bad at all, the rice was just a tad crunchier than I or they were used to. But making mistakes is how you learn...C'est la vie. 

3. Combine milk, halved vanilla bean and rinds in medium saucepan; bring to a boil. Remove from heat; stand; covered for 5 minutes. 

4. Whilst the hot milk mixture is cooling, whisk eggs, egg white and sugar in medium bowl. Gradually whisk hot milk mixture into egg mixture and discard the vanilla bean. 

5. Spread COOKED (these capitals are more for me than for you lovely cooks) into prepared dish and pour egg mixture over rice. Place dish in a large baking dish (I used a roasting tin) and add enough water to baking dish so that the water level comes halfway up the side of the rice dish. 

6. Bake, uncovered, for about 1 hour or until egg mixture is set. 

Serve warm with low fat cream (as the recipe suggests) , or with raspberries for a healthy option, as I did. 

Serves 8 
Per serving: 48.g fat / 1094 kJ (261 calories) / 

Recipe from 'The Australian Women's Weekly Low-Fat Food for Life Cookbook'. 


x E

Saturday, September 24, 2011

TASTY TABBOULEH


My mother has been making tabbouleh for as long as I can remember. The long painstaking process of picking the parsley so that there were no stems whatsoever was lost on me. I recall it taking hours and my mother complaining the whole time. However, when she served that tabbouleh on the dinner table all six of us ate every last scrap on our plates. An ingenious way to make four children under 8 years of age eat their vegetables! 


Now my mothers recipe is so extensive that you want to pull your hair out and just give up. As a result, I have lasted over 23 years without ever making this dish, even though it is one of my favourite childhood meals. Browsing the Women's Weekly World Table cookbook this week I came across an easier version of the recipe. I knew it was time to face my fears and try my hand at making this Middle Eastern dish. 


Ingredients 

  • 1/4 cup (40g) bourghal 
    • I like to use NatureFirst Premium Fine Grit Bourghal (available in the Health Aisle at Coles). 
  • 3 medium tomatoes (450g)
  • 3 cups coarsely chopped fresh parsley (preferably flat-leaf)
  • 3 green onions (scallions), chopped finely 
  • 1/4 cup coarsely chopped fresh mint 
    • I omitted this as I am not a mint fan and my mother never used mint. But to each his/her own!
  • 1/4 cup (60ml) lemon juice
  • 1/8 to 1/4 cup (60ml) olive oil 
    • The recipe calls for 1/4 cup, however in my attempts to make this recipe a little healthier I used around 40ml or so of olive oil, so a little more that 1/8 of a cup. Once again, completely your call.

Cooking 

1. The most painstaking process of this recipe (to me) is to pick the parsley off their stems. To make 3 cups of coarsely chopped parsley this is a big task. My advice; have fun with it. You do not need to pick the parsley with 100% precision (sorry dear mother). If a little bit of a stem goes in there, the world does not end. All will be well. Another piece of advice; engage someone to help you. I choose to employ my younger sister as a parsley slave. It took half the time and we had a bit of fun. 

2. After you have picked the parsley (about 3 1/2- 4 cups) coarsely chop the parsley with a sharp knife to make 3 cups. Once again, there is no need to be 100% perfect. 

3. Place bourghal in a medium shallow bowl. Halve the tomatoes (I quartered them) and scoop pulp from tomatoes over bourghal. Chop tomato flesh finely and spread over bourghal. Mix well; cover and refrigerate for 1 hour. 

4. Add remaining ingredients to bourghal mixture; toss gently to combine. 

My experience making this dish was so pleasant and uncomplicated that I made it again 2 days later. Give it a try, you won't be disappointed. The fresh ingredients taste divine. 

Preparation & cooking time- 30 minutes (plus refrigeration time) 
Serves 4
Nutritional value per serving: 14.1 total fat (or less if you use less olive oil) / 790 kJ (189 calories) / 9.2g carbohydrate / 3.4g protein / 5.6g fibre. 


xx E

WOMAN'S WEEKLY YOU HAVE DONE IT AGAIN


I frequent libraries around Brisbane every week or so in an attempt to discover new cookbooks. I uncovered the beauty above a few weeks ago. 475 pages of recipes from Italian, French, Middle Eastern, Indian, Australian, Asian, Mexican, Greek, British, Spanish, American and Moroccan origin. I was ecstatic! Besides the amazing photos of the food and cultural aspects of each country, the recipes are exotic, unique and colourful. Below are some of my favourite pictures in the book. I will attempt to cook a choice few of these alluring and fascinating dishes in the coming weeks, starting with Middle Eastern favourite, Tabbouleh. 


xx E