Monday, August 31, 2015

BEEF VERMICELLI SALAD


I have a strange obsession with rice vermicelli noodles. I could eat them every single day if I allowed myself. Here's a very fresh and simple beef vermicelli salad that I love to make. You can use whatever fresh vegetables you have on hand! This is a beautifully light, fresh and vibrant salad, perfect for Spring or Summer! 


INGREDIENTS

  • 400g lean eye fillet beef, cut into thin strips
  • 2cm fresh ginger, grated
  • 1 garlic clove, finely chopped 
  • 1 tablespoon oyster sauce 
  • 1 teaspoon extra virgin olive oil 
  • 100g rice vermicelli noodles 
  • 1 large carrot, grated
  • 1 medium capsicum, finely chopped
  • 1 continental cucumber, finely chopped
  • 2 shallots/spring onions, finely chopped
  • Optional- 2 tablespoons of fresh coriander, finely chopped 
Dressing 
  • the juice of half a lime (around 2 tablespoons)
  • 1 teaspoon fish sauce 
  • 1 tablespoon soy sauce 
  • 1-2 tablespoons water 

COOKING 

1. Combine the beef strips with the ginger, garlic and oyster sauce and marinate in the fridge for 10 minutes. 

2. Meanwhile, prepare the salad. Place the vermicelli noodles in a medium heatproof bowl and pour boiling water over noodles. Stand for 2-3 minutes or until noodles are tender, then drain well in a sieve or colander. Pour cold water over the noodles and drain again. 

3. Preparing the salad: In a large bowl toss the cooked vermicelli noodles with the carrot, capsicum, cucumber, shallots and coriander, if using. 

4. Preparing the salad: Make the dressing by combining all the ingredients in a small bowl and stirring.  If the dressing is too strong, add more water, just a splash at a time. 

5. Once the 10 minutes of marinating is up, heat the oil in a medium frying pan over low-medium heat. Add the beef strips and cook, stirring often, for around 5 minutes or until the beef is browned to your liking. Remove from heat. 

4. Add the cooked beef to the salad and drizzle the dressing over the top. Toss well and serve. 

Serves / 4
Total Preparation time & Cooking time / around 20 minutes 

x Emily 

Friday, August 28, 2015

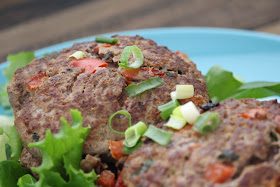
ASIAN BEEF PATTIES / NAKED BURGERS


These Asian beef patties are a favourite of mine to make, as they are light, filling and delicious. I call them 'naked burgers' as you can eat them (and should eat them for dinner) without any bread; instead they can be eaten 'naked' as they are or wrapped in lettuce leaves. Make sure you consume a vegetable side when eating these as they are low in veges. 


INGREDIENTS

  • 500g lean minced beef
  • 1/2 - 1 teaspoon dried chilli flakes
  • 1 teaspoon fish sauce 
  • 1 tablespoon oyster sauce 
  • 1 tablespoon soy sauce
  • 1 egg, preferably free-range 
  • 2 tablespoons shallots finely chopped
  • Optional - 2 tablespoons fresh coriander, finely chopped
  • 1/2 a small red capsicum, finely chopped
  • 1 teaspoon olive oil 
  • Optional - Lettuce leaves (to wrap the patties in)

COOKING 

1. Combine beef, chilli, fish sauce, oyster sauce, soy sauce, egg, shallots, coriander (if using), capsicum and a pinch of ground black pepper in a large bowl. Using your hands, mould the mixture into four even-sized patties. Place on a large plate, cover with plastic wrap and place in the fridge for 15 minutes. 

2. When the 15 minutes is up, heat a large frying pan over medium heat and add the oil, swirling to coat the pan. Place patties in the pan and cook for 3 minutes on each side, covered. Check if the patties are cooked by cutting a patty in half and seeing if any red flesh remains; if it does, continue cooking. 

3. Serve warm with a vegetable side, such as a salad, steamed corn or sweet potato fries. 

Serves / 4 accompanied by a side 
Total Preparation time / 30 minutes (including 15 minutes in the fridge)


Total Cooking time / under 10 minutes 

x Emily 

Thursday, August 27, 2015

CHERRY TOMATO, BASIL & FETA BRUSCHETTA


This humble bruschetta may not be up to the Italian standards, but it is healthy, quick to whip up and is good enough for me! I love really simple bruschetta and tend to go by the pizza philosophy; that less is more. In my opinion all you need for a good bruschetta is some bread, garlic, tomatoes, basil and a pinch of oil & vinegar; everything else is just extra. Salt can be added, but for weight management I like to add ground black pepper. 

INGREDIENTS

  • 4 slices multigrain, wholemeal bread (or gluten-free if intolerant), cut into quarters 
  • 250g (1 punnet) cherry tomatoes
  • 1/2 small red onion, finely chopped
  • 2 tablespoons balsamic vinegar
  • 40g reduced-fat feta cheese, crumbled
  • 3 tablespoons fresh basil, finely chopped
  • 1 teaspoon extra virgin olive oil 
  • 1 large garlic clove, halved 

METHOD 

1. Toast the quarters of bread in a fan-forced oven of 200 degrees celsius for 10-15 minutes (depending on how toasted you like your bread). 

2. Meanwhile, make the bruschetta by preparing and combining the cherry tomatoes, onion, vinegar, cheese, basil and oil in a medium bowl. Season with ground black pepper. Leave the bruschetta to marinate together for at least 5 minutes. 


3. Once the bread is toasted and the bruschetta marinated, either spoon the bruschetta onto each quarter of bread or leave your guests to do this; the latter may be the better option as the bread will go soggy if the bruschetta is left to soak into it. 

Serves / 4 as an entree, snack or side 
Total Preparation time / 20 minutes max


x Emily 

Wednesday, August 26, 2015

HAM, TOMATO & ZUCCHINI RISOTTO


This risotto was created out of thin air during one day when I had a double shift at work. I raced home, napped for 30 minutes, then rushed around my kitchen like a mad woman throwing together something for dinner. Being exhausted as I was and scatter brained (as I frequently am), I cooked the rice first instead of letting it cook with the stock and other ingredients. Unexpectedly this little error made the dish taste even better, as the rice became particularly tender, however not too soft. I highly recommend that everyone try to make a risotto this way at least once. The tomato, zucchini and ham were a great combination and tasted even better for lunch the next day. NB: I make my risottos with brown rice as it is better for me than white risotto rice. Brown rice has a lower GI rating than white rice and is packed with proteins, calcium, magnesium, fibre and potassium. 


INGREDIENTS


  • 1 cup brown rice
  • 2 cups water
  • 1 teaspoon extra virgin olive oil
  • 1/2 red onion (60-80g), finely chopped
  • 1 garlic clove, diced 
  • 1 cup salt-reduced vegetable stock 
  • 2 tablespoons tomato paste
  • 500g (or 5 small) tomatoes, diced 
  • 2 medium zucchini (around 250g), diced 
  • 100g reduced-fat ham, roughly diced
  • 40g reduced-fat feta, crumbled 
  • Optional- fresh chopped chives and/or parsley, to serve 

COOKING 

1. Bring the rice and 2 cups of water to the boil, covered, then simmer for 15 minutes or until all the water has been absorbed. Remove from the stove. 

2. Whilst the rice is cooking, prepare all the other ingredients. 

3. Heat the olive oil in a large, deep frying pan over medium heat and cook the garlic and red onion, stirring for 2 minutes or until onion has softened. Add the vegetable stock, tomato paste, tomatoes, zucchini and cooked rice and bring to the boil, covered. Reduce the heat to the lowest and simmer for around 10 minutes or until the rice is very tender and all of the liquid has been absorbed. Stir in the ham, then remove from the heat. 

Divide the risotto into four servings and top with 1/4 of the feta cheese and the herbs, if using. 


Serves /
Total Preparation time & Cooking time / approx. 35 minutes 


x Emily 

Tuesday, August 25, 2015

TUNA STEAKS with STEAMED CORN & SALAD


A client recommended the 'Ocean Chef' brand of frozen fish to me recently, available at Woolworths supermarkets. In an effort to introduce fish into my diet (and having not been a fan of seafood for most of my life!) I decided that it was time to bite the bullet and make some fish meals. Tuna is a great source of protein, is rich in omega 3 fatty acids and is available for Pestacarians to eat! The Yellowfin Skinless Tuna Steaks that I used are often on sale, as are the other types of frozen fish from Ocean Chef, and feature 8 steaks to a pack, 1 per single serving, hence they are very reasonably priced. I was very pleasantly surprised by how delicious the tuna steak was and how easy and quick it was to cook. You can add any healthy sides that you would like to your tuna steak, I have listed my two accompaniments below. 

INGREDIENTS

Tuna Steaks 
  • 2 similar sized (in thickness and weight) frozen or fresh tuna steaks, completely thawed if frozen
  • paper towel
  • 1 teaspoon extra virgin olive oil
  • 1 tablespoon soy sauce
  • 2 tablespoons lemon juice
  • 1 garlic clove, crushed or finely chopped
  • 2 tablespoons shallots, finely chopped
Steamed corn 
  • 2 corn cobs, hulks and silks removed and cut into even rounds
  • ground black pepper 
  • Optional - fresh herbs, such as chives or basil, finely chopped 
Basic Salad
  • a generous handful of washed mixed lettuce 
  • 1/2 a small avocado, diced 
  • 1 medium tomato, diced
  • 1/2 a lebanese cucumber or 1/4 of a continental cucumber, diced 
  • 20g reduced-fat feta, crumbled 

COOKING 

1. Wash & rinse the tuna steaks, then pat dry with paper towel. 

2. Brush the tuna steaks with olive oil, then combine the remaining steak ingredients in a small bowl. Pour over the steaks and place in the fridge to marinate for a minimum of 15 minutes and a maximum of 1 hour. 

3. Meanwhile, make the steamed corn by bringing a medium saucepan filled halfway with water to the boil. Add the corn rounds and steam for 5 minutes or until tender. Remove from heat and drain well with cold water, then dry well and toss with ground black pepper & fresh chives, if using. 

4. Whilst the corn is steaming make the basic salad by combining all the ingredients and tossing well. 

5. Once the steaks have marinated for over 15 minutes, warm a grill plate over medium heat and cook the steaks for 2-3 minutes on each side or until the fish starts to flake when tested with a fork. You want the tuna to still be pink in the middle. I like tuna quite pink in the middle, hence if you do not, leave it on the grill/in the pan for longer! 
**NB: If you do not have a grill plate, you may pan-fry the tuna steak by cooking them over medium heat in a medium frying pan, for 2-3 minutes each side, turning the steak over once during cooking. You can test if the tuna is cooked by using the same fork method as above.  

6. Arrange the 1 steamed corn,1/2 of the salad and a tuna steak on a plate. Serve warm. 

Serves /
Total Preparation time & Cooking time / minimum of 20 minutes (based on a 15 minute marinating time) 

x Emily 

Sunday, August 23, 2015

HOW TO POACH AN EGG


In this breakfast dish I describe the fine art behind poaching eggs (or at least what I have picking up from my partner, cooking magazines and my mother). Do not be afraid to try this recipe because of the detailed 3rd step, as this detail is designed to help, not hinder your cooking. Best of luck! I think if you can poach an egg and serve it in a somewhat 'pretty' condition, you can do pretty much anything in the kitchen (besides perhaps de-boning a duck or killing a live lobster).


INGREDIENTS

  • 2 free range eggs 
  • 2 tablespoons white vinegar 
  • 1/4 a small avocado, generously spread onto the toasted bread
  • 1 piece of multigrain, wholemeal or gluten-free bread, toasted 
  • 1 handful washed baby spinach
  • 1 small to medium tomato, sliced
  • Optional- a squeeze of lemon and a tablespoon or 2 of chopped fresh herbs, such as basil, chives, parsley, etc. 
  • 10g reduced-fat feta, crumbled 

COOKING 

1. Bring the eggs to room temperature as warm eggs will take less time to poach. Crack one egg into a small cup and add 1 tablespoon white vinegar. Repeat in a separate cup with the other egg. (I use vinegar as this helps to set the egg). 

2. Fill a large saucepan/ frying pan with 8cm of water. Bring the water to the boil, then reduce to medium-low heat and simmer. (You will know the water is simmering when you can see small bubbles at the base of the pan). Use a wooden spoon or whisk to stir the water in one direction, creating a whirlpool. Pour in one egg at a time, making sure to pour the egg as close to the water surface as possible, in the middle of the whirlpool. (The whirlpool motion is essential as it makes the egg white wrap around the egg yolk to form a round shape). Cook for 2-3 minutes for a semi-soft yolk or 3-4 minutes for a firmer yolk. NB- Do not stir the water once the egg is cooking. 

3. Use a slotted spoon to transfer the egg on top of your toast (which can be 'buttered' with avocado). Serve the poached eggs with baby spinach, tomato, lemon juice, fresh herbs and feta piled on top or on the side. 

Serves / 1 
Total Preparation time / 15 minutes 
Total Cooking time / 12 minutes 


x Emily 

SWEET SUMMER SLAW VERMICELLI


The name and adaptation of this recipe comes from one of Yotam Ottolenghi’s amazing vegetarian creations. Yotam likes to make this ‘slaw’ as he calls it, with caramelised macadamia nuts and lots of papaya, green cabbage, mint and coriander. Not being a fan of caramelising ingredients due to the high quantity of butter and sugar used, I decided to opt for a relatively small amount of peanuts and raw shallots. You could serve this salad naked, or with vermicelli noodles like myself to make it more filling. Definitely a summer salad for the hot steamy Brisbane weather! 


INGREDIENTS


Dressing
  • the juice of 2 small limes 
  • 1 large garlic clove, finely chopped
  • 1/4 teaspoon dried chilli flakes
  • 1 tablespoon soy sauce
  • 1 tablespoon maple syrup
  • 2 tablespoons sesame seeds
  • 2 tablespoons water 

Salad

  • 150g rice vermicelli noodles
  • 1/2 a red cabbage, washed & finely shredded
  • 2 large carrots (around 300g), finely grated
  • 1 medium mango (around 100g), diced 
  • 2 spring onions, finely chopped
  • 2 tablespoons fresh basil / coriander, torn 
  • 1/4 cup roasted unsalted peanuts
  • Optional- 1 ripe avocado, diced 


METHOD 

1. To make the dressing, whisk all the ingredients in a small bowl. 

2. Fill a large heatproof bowl with boiling hot water and place the raw vermicelli in it. Leave to sit for 5 minutes, then drain well with cold water. Place the cooked vermicelli in a large serving bowl and toss the red cabbage, carrot, mango, spring onion, basil, peanuts, dressing and avocado, if using, in the bowl. Serve cold. 


Serves / 4
Total Preparation time / 15 minutes 
Total Cooking time / max 10 minutes 

x Emily 

Wednesday, August 19, 2015

BLACK BEAN & CHEESE QUESADILLAS with AVOCADO SALSA


I have a slight obsession with black beans, as some of you may be able to tell (they have appeared on this blog many times!). The recipe below is loosely based on a Bill Granger recipe and is a favourite lunch and dinner meal of mine. These quesadillas are quite filling and are such an easy vegetarian recipe to whip up. I like to make them on mountain bread as they are lighter and lower in calories than flour tortillas. Black beans are now readily available at all major supermarkets; just make sure to read the labels and buy a brand with a low sugar content! 


INGREDIENTS

Quesadillas 

  • 2 x 400g tin black beans, drained & rinsed
  • 100g light tasty cheese, grated
  • 1 spring onion, finely sliced
  • 2 tablespoons fresh coriander, finely chopped
  • 2 teaspoons taco seasoning 
  • 8 flour tortillas or 8 mountain wraps 
  • rice bran / olive oil 
Avocado Salsa
  • 1 ripe avocado, mashed 
  • 1 spring onion, finely chopped
  • 1 tablespoon fresh coriander, finely chopped
  • 1 tomato, finely diced
  • 100g cucumber, finely diced
  • 2 tablespoons lime juice

COOKING 

1. Combine the black beans, cheese, spring onion, coriander, taco seasoning and a generous amount of ground black pepper in a large bowl and mix well. 

2. Heat a large frying pan over medium heat, adding 1 teaspoon oil. Swirl oil to coat the pan, then place 1 tortilla or mountain wrap in the oil and swirl to coat. Spoon 1/4 of the black bean mixture onto the tortilla and spread it towards the edges, then cover with another tortilla/wrap, pressing down the edges so that they stick together (or also do). After 2-3 minutes, carefully flip the quesadilla and brown the other side for the same amount of time or slightly less. When cooked place on a plate and cover to stay warm. Repeat this process until all tortillas/wraps are used, adding more oil only when needed. You may need to turn the heat down to medium-low from medium once the pan heats up, as the quesadillas will brown much quicker. 

3. Whilst the quesadillas are cooking make the avocado salsa by combining all the ingredients and adding ground black pepper and a pinch of sea salt. 

Cut the quesadillas into quarters and serve the quesadillas alongside 1/4 of the avocado salsa. 

Serves / 4 (4 quarters per person = 2 tortillas / 2 mountain wraps)
Total Preparation time / 10 minutes 
Total Cooking time / around 20 minutes 

x Emily 

Tuesday, August 18, 2015

TURKEY, EGG & LETTUCE CUPS


I really love turkey and often find myself craving unhealthy white bread sandwiches filled with turkey, cranberries, brie and mayonnaise! It's not something that I ever allow myself, so instead I came up with these turkey lettuce cups which are much, much healthier and do not add centimetres to my waistline. My husband likes to use bacon instead, which you can substitute for turkey or ham, as long as you remove the fat. 


INGREDIENTS

  • 150g shaved lean turkey breast or ham, roughly chopped
  • 4 eggs (preferably free-range)
  • 250g low carb kestrel potatoes, peeled & chopped into small pieces
  • 150g cucumber, roughly chopped
  • 2-3 tablespoons fresh chives, finely chopped
  • 1/4 iceberg lettuce or a baby cos lettuce, washed 
  • Optional- 1 tablespoon of reduced-fat grated cheese per serving 


COOKING 

1a. Bring a large saucepan of water to the boil, with the potatoes in the water. Cook for 8-10 minutes or until tender, then drain well in a colander with cold water.

1b. Bring a small saucepan of water to the boil with the eggs in the pan. Boil for 3 minutes, then simmer for 5 minutes. Remove from the pan and drain under cold water. When cool enough to handle, peel the eggs from their shells and roughly chop the eggs. 

2. Combine the cooked potatoes, chopped eggs, turkey, cucumber, chives and a generous amount of ground black pepper in a medium bowl and toss gently. 

3.  Spoon the potato, egg & turkey mixture into the lettuce cups and serve warm or cold. Add 1 tablespoon of cheese per serving, if desired. 

Serves / 
Total Preparation time /  
Total Cooking time / 30 minutes


x Emily 

VEGETABLE QUICHE


So simple to make, this protein-packed quiche can be stored in the fridge for a few days and used for lunches or for dinner. You can even add some meat for those carnivores out there, by adding 100grams or so of roughly chopped ham. I've made this dish with flour and with polenta and love both ways. I try to add lots of different herbs to this quiche, as they really add to the flavour. I love using chives, basil and parsley, however you could use whatever you have on hand; even dry herbs would work. 

INGREDIENTS 

  • olive oil spray or 1 teaspoon 
  • 1/2 a leek (white part only) or 1/2 a brown onion, finely chopped
  • 1 medium carrot, grated
  • 1 medium zucchini, grated 
  • a large handful of baby spinach, washed & roughly chopped
  • 6 eggs (preferably free range), beaten 
  • 50g reduced-fat grated cheese
  • 1/2 cup plain flour, or gluten free flour or polenta 
  • 3 tablespoons fresh herbs such as parsley, chives, basil, finely chopped

COOKING 

1. Preheat oven to 180 degrees fan-force. Lightly spray or brush a 20cm x 30cm baking dish with minimal oil (no more than a tablespoon if your oil is liquid, not a spray. 

2. Assemble all of the other ingredients in a large bowl including 1/2 a cup water and stir well to combine, adding a generous amount of ground black pepper. 

3. Pour the mixture into the prepared dish and make sure it is evenly spread. Cook in the oven for around 40-45 minutes or until quiche is lightly golden and the egg is firm. Serve warm or cold. 

Serves /
Total Preparation time / 15 minutes 
Total Cooking time / 40-45 minutes 


x Emily 

Saturday, August 15, 2015

PUMPKIN, SILVERBEET & SWEET POTATO MASHUP


This meal was loosely based on a delicious breakfast I had at Elk cafe at Broadbeach. I loved my meal so much that I endeavoured to remember the flavours and recreate this mashup of sorts in my own kitchen. This mixup of hearty winter vegetables is so tasty that the bacon or ham is completely optional and can easily be omitted without reducing the flavour. This is a true winter meal that can be served for breakfast, lunch or dinner! 

Ingredients
  • 1 large sweet potato (600g), peeled and roughly chopped
  • 450g pumpkin, peeled & seeds removed, roughly chopped
  • 1 tablespoon extra virgin olive oil 
  • 1/2 a large leek, white part only, finely chopped
  • Optional - 120g bacon or ham, roughly chopped
  • 1/2 a bunch of silverbeet, shredded 
  • 2 tablespoons of fresh basil and / or fresh parsley, finely chopped 


Cooking 

1. Bring a medium saucepan of water to the boil over high heat. Add the sweet potato and cover with a lid. After 5 minutes add the pumpkin and cover. Remove from the heat after 5 more minutes and drain well. 

2. Once the sweet potato has been added to the boiling water heat a large, deep fry pan over medium heat and add the oil, swirling to coat. Add the leek to the pan and cook, stirring, for 1-2 minutes or until the leek becomes brighter in colour. Next add the bacon to the pan and cook, stirring, for 2 minutes. Reduce the heat to medium-low, add the silverbeet and stir well to combine, then cover and leave for 2-3 minutes or until the silverbeet has completely wilted. 

3. Remove from the heat and stir the cooked sweet potato and pumpkin, herbs and a pinch of sea salt & ground black pepper into the silverbeet mixture. 

Serves /
Total Preparation time / 15-20 minutes 
Total Cooking time / 15-20 minutes 

x Emily 

Friday, August 14, 2015

PRAWN, ZUCCHINI & TOMATO PASTA


I am trying to incorporate more seafood into my diet as I know how good it is for me! My husband unfortunately does not really care for it so this will be interesting! First up: a very simple but delicious and hearty prawn pasta. The prawns should be fresh from a supermarket deli or a butcher. I like to purchase them already cooked with their shells removed as it is a real time saver. You often cannot buy them sans tails, however it only takes a few seconds to remove the tails and I quite enjoy this task! When I'm not in a big rush I cook the pasta first, drain it and then use the same saucepan for step 2, however you can have both step 1 and 2 going at the same time (just make sure the water has boiled in step 1 before you start step 2, so that the pasta will be cooked by the time you need it to be!). 


INGREDIENTS
  • 400g gluten-free pasta (or regular pasta if not allergic/intolerant)
  • 1 tablespoon extra virgin olive oil 
  • 2 medium zucchini, chopped into 2cm cubes
  • 1/2 red onion, finely chopped
  • 1 large garlic clove, finely chopped
  • 2 tablespoons tomato paste 
  • 1 small red chilli, finely chopped or 1/2-1 teaspoon chilli flakes
  • 300g cooked prawns, shells removed, with or without tails
  • 250g cherry tomatoes, washed & halved
  • 2 tablespoons fresh basil and / or fresh parsley 
  • 40g reduced-fat feta, crumbled or 40g shaved paramesan (or if dairy free, 40g goats or sheep's feta)

COOKING 

1. Bring a large, lightly salted saucepan of water to the boil over high heat. Add the pasta and cook, stirring occasionally, for 6-8 minutes or until the pasta is cooked to your liking. Remove from heat and drain in a colander, reserving 1/2 a cup of the pasta water. 

2. Meanwhile, heat the oil in a large, deep fry pan over medium heat and swirl to coat. Add the zucchini pieces and cook, stirring frequently, for 2 minutes. Add the onion and garlic and stir all together for another 2 minutes. Pour in the tomato paste and chilli and stir well to combine. Gradually pour in the 1/2 cup pasta water you reserved, just a couple tablespoons at a time and continue stirring until the water is absorbed. Reduce the heat to a simmer and add the cooked pasta, prawns, cherry tomatoes, herb/s and cheese. Stir until the pasta is warmed through and all ingredients are combined. Remove from heat. 

Divide pasta evenly into 4 bowls and serve with extra herb/s on top, as well as a generous pinch of ground black pepper, if desired. 

Serves / 
Total Preparation time / around 15 minutes 
Total Cooking time / 15-20 minutes 


x Emily 

Tuesday, August 11, 2015

EASY AVOCADO DIP


When I did a ski season in Canada in 2007, my friend and I lived off avocado dip and crackers. Our avocado dip consisted of a ripe avocado, lemon juice and far too much salt. Over the years I like to think that I have perfected this little dip by adding a few choice Indian spices. I especially like that I use no oil, as so many dips do. You can substitute the lime juice for lemon or the chives for chopped coriander or parsley if you wish. 


INGREDIENTS

  • 2 ripe avocados 
  • 1 teaspoon ground cumin
  • 1 teaspoon ground coriander
  • 1 garlic clove, crushed or very finely chopped 
  • the juice of 1 small to medium lime 
  • a pinch of sea salt and ground black pepper 
  • Optional - 2 tablespoons fresh chives, finely chopped

METHOD 

1. Mash avocado into a paste and then add all the other ingredients, stirring well to combine. Make sure you taste the dip a few times, adding a little more of an ingredient if need be. Serve alongside raw vegetables or crackers. 


x Emily 

Saturday, August 8, 2015

CORN, CHICKPEA & CHICKEN SALAD


I fed this salad to my dad and myself after we had spent a gruelling few hours in my garden on a hot day, as I wanted to pump us full of protein! Hence the chicken and the chickpeas. You can get creative with this corn salad and use different meat, such as turkey or ham and/or toss other vegetables in to the mix; capsicum, beans, tomatoes, herbs, etc.  To me, this is a perfect summer salad! If you have a bbq or a grill plate take the opportunity to grill your corn cobs, as they taste superb. 


INGREDIENTS

  • 500g chicken breasts, fat removed and cut into even 5cm strips
  • 1 tablespoon rice bran oil
  • 1 x 400g tin chickpeas, washed & drained
  • 1 small red onion, cut into thin strips
  • 1 large or 2 small ripe avocado/s, diced into small pieces & combined with a few teaspoons of lemon juice 
  • 40g feta cheese, crumbled 
  • 2 generous handfuls baby spinach or mixed lettuce
  • 2 medium corn cobs, cut in half and ends removed 
  • 200g mango pieces 

COOKING 

1. Cook the corn by bringing a medium saucepan of water to the boil, covered. Once boiled add the corn and steam for 4 minutes or until the kernels are just tender. 

2. Remove the kernels by standing the cooked corn round on its end and using a sharp knife to run down the length of the round. Place in a large serving bowl. Add the chickpeas, red onion, avocado, feta, lettuce/spinach and mango pieces (or leave the mango separate as the photo shows).  

3. Toss the chicken strips with the oil. Heat a grill plate or a large frying pan over medium heat and cook the chicken until grill marks appear or until the chicken is golden in colour. 
Add the chicken strips to the salad bowl, tossing well to combine or leave separate as the photo shows. Serve warm or cold. 

Serves / 
Total Preparation time / 10 minutes 
Total Cooking time / 20 minutes 

x Emily 

Thursday, August 6, 2015

RED LENTIL SOUP


I do not subscribe to the no lentils and legumes rule that the Paleo eating plan enforces, as I love their nutty & earthy taste and the benefits far out weight whatever carbs they contain. Low in calories, basically fat-free and high in nutrients, lentils & legumes should be on everybody's plate at least once a week. Lentils themselves lower cholesterol, are a great source of protein, iron and magnesium, assist in weight loss, stabilise blood sugar due to their high fibre levels, increase energy and play a role in both heart and digestive health. I chose red lentils for this soup as they are quicker to cook than any other types of lentils, making them a perfect match for a busy cook. Do not be alarmed when your red lentils change colour whilst cooking! They will start off as a beautiful salmon colour when raw and will fade to a golden yellow colour as they cook. 

INGREDIENTS

  • 1 cup red lentils
  • 3 cups salt-reduced vegetable stock
  • 6 cups water
  • 3cm fresh ginger, finely chopped
  • 3 garlic cloves, finely chopped
  • 1 medium brown onion or medium leek (white part only), finely chopped
  • 2 medium carrots, peeled and chopped into even pieces
  • 200g pumpkin, peeled & seeds removed, chopped into even pieces
  • 1 head of broccoli, cut into even sized florets and stalk finely chopped 
  • Optional- 2 celery stalks, chopped into even pieces
  • Optional- 2 medium tomatoes, chopped into even pieces
  • 2 tablespoons tomato paste
  • 2 bay leaves
  • 1/2 cup fresh parsley, finely chopped, plus extra to garnish
  • Optional- 4 sprigs of thyme
  • ground black pepper 

COOKING 

1. Combine the lentils, stock and water and bring to the boil in a large saucepan, covered. 

2. Once boiled, reduce the heat to a low simmer and add the ginger, garlic, onion/leek, carrot, pumpkin, broccoli, celery & tomato if using, tomato paste, bay leaves, fresh parsley and thyme if using. Simmer, covered, for around 20 minutes or until the liquid has thickened slightly and all the vegetables are tender. 

3. Remove from the stove, find and discard the bay leaves and the thyme sprigs. Stir in a generous pinch of ground black pepper. Serve warm, with extra parsley on top, if desired. 

Serves /
Total Preparation time / up to 25 minutes 
Total Cooking time / 30 minutes 
x Emily 

Monday, August 3, 2015

FREE from REFINED SUGAR COOKIES


If you ever seen a professional cook or chef being interviewed they will frequently talk about ‘failures’ they have experienced in the kitchen. I’ve had many, which I will happily share; once I left rice boiling on the stove for not one but TWO hours (needless to say my pan was almost incinerated), another time I served hard as a rock spaghetti (how you screw pasta up I don’t even know) and on a few occasions I have made cookies for my fiancée only to burn them to an absolute crisp. All these failures have been imperative to my cooking journey, however, as I have learnt vital lessons, such as which ingredients never ever go together and that you should always watch the stove and not walk away and get absorbed in another task. All invaluable experiences and not always common sense to all.

 The reason why I bring up this topic is that these 'Free from Refined Sugar cookies' were my third attempt at making gluten-free, dairy-free cookies from scratch. First I tried a chia & poppy seed combination which was basically tasteless (although my gorgeous fiancée ate them all). Secondly I baked a cacao orange dough which was extremely dry and inedible (again they were consumed in a few days by Chris). Third times the charm!   I hope you enjoy these two cookie recipes  

And most importantly; don't sweat the failures in the kitchen. My beautiful friend Dani assured me after my second failed cookie attempt that the next batch would be a hit and it was. Keep experimenting with recipes and flavours - you will constantly be rewarded with new knowledge if not always edible dishes;)

INGREDIENTS

  • 150g almond meal 
  • 100g Medjool dates, roughly chopped & pips removed 
  • 2 eggs, preferably free-range, lightly beaten 
  • 2 tablespoons organic maple syrup
  • 1 teaspoon gluten-free baking powder
  • 1 tablespoon coconut oil, in liquid form
To make Date & Cinnamon cookies add:
  • 1 teaspoon ground cinnamon
  • 1 heaped tablespoon coconut flour 
To make Date & Orange cookies add: 
  • 1 heaped teaspoon of finely grated orange zest
  • 3 tablespoons fresh orange juice 

BAKING 

1. Preheat a fan-forced oven to 160 degrees celsius. Line a large baking tray with baking paper. 

2. Process the dates in a food processor until smooth. You may need to add a splash of water for the dates to obtain a smooth consistency. 

3. Combine the almond meal and dates in a large bowl and mix well. Create a well in the middle of the bowl and pour in the remaining ingredients (the eggs, syrup, baking powder, oil, and either the cinnamon & coconut flour or the orange zest & juice) and stir with a wooden spoon to combine. 

4. With wet hands handle 1 tablespoon of the cookie mixture and roll into a ball. Place the ball onto the tray and then gently press the back of a fork into the batter so that the dough becomes a circle. Continue this until no dough remains, making sure to place the cookies a few centimetres apart on the tray. Place the tray in the oven for around 30 minutes or until the outsides of the cookies are lightly golden. Remove from the oven and leave to cool on a wire rack before eating. 

Makes / around 15 
Total Preparation time / 10-15 minutes 
Total Baking time / 30 minutes 

x Emily 

Sunday, August 2, 2015

BAKED EGGS with RATATOUILLE


If you are not a fan of eggs, you can make this ratatouille without the eggs and just the vegetables. I used oregano and chilli flakes to add some pizazz and spice, however you could use any seasoning you have on hand, such as fresh or dried basil, mixed herbs, smoked paprika, ground cumin, coriander etc. This is a wonderful recipe for people who want to forgo meat for a night, as the eggs and all the vegetables are packed with protein, fibre and nutrients.


INGREDIENTS
  • 1 tablespoon rice bran oil, plus extra to spray 
  • 2 garlic cloves, finely chopped 
  • 1 medium red or brown onion, finely chopped
  • 1 large green capsicum (300g), roughly chopped
  • 1 large green capsicum, (300g), roughly chopped
  • 2 medium zucchini (350g), roughly chopped
  • 1 large or two small carrots (180g), roughly chopped
  • 2 cups passata (Italian tomato cooking sauce) or alternatively you could use 2 cups roughly chopped tomatoes 
  • 1 tablespoon fresh or dried oregano
  • 1/2-1 teaspoon chilli flakes 
  • 4 eggs, preferably free-range 

COOKING 

1. Heat 1 tablespoon rice bran oil in a large, heavy-based frying pan over medium heat. Add the onion and garlic and cook, stirring for 2-3 minutes or until the onion is soft. Add the capsicums, zucchini and carrot and cook, stirring occasionally for 5 minutes. Pour in the passata (or tomatoes), oregano, chilli flakes and if using sea salt & ground black pepper and lower to a simmer, covered. Cook, stirring occasionally, for around 10 minutes or until the vegetables are tender and the sauce thickens slightly. 

2. Meanwhile, preheat a fan-forced oven to 180 degrees celsius. Lightly spray an overproof tin/dish with oil. When the ratatouille has thickened, remove from the stove and pour into the prepared tin. Make 4 large indents in the ratatouille and carefully crack one egg into each. Bake for 20 minutes or until egg whites have set and yolks are cooked to your specification. Serve alone or with a slice of wholemeal, multigrain or gluten-free toasted bread. 

Serves / 4 (without bread) 6 (with bread)  
Total Preparation time / 20 minutes (a few more if chopping tomatoes)
Total Cooking time / 40 minutes

x Emily